> ## Documentation Index
> Fetch the complete documentation index at: https://kb.aampe.com/llms.txt
> Use this file to discover all available pages before exploring further.
# Emarsys Integration
> Estimated setup time: 30 minutes
## Requirements
* An API user name and secret
* A dedicated push campaign with personalization tokens and an external event
Aampe will first guide you through the creation of a dedicated transaction externally triggered push campaign. It will then message your users by calling the Emarsys [External Event trigger API](https://dev.emarsys.com/docs/emarsys-api/61b720d3c0be6-trigger-an-external-event) on your behalf.
## Set Up API Permissions
### Create an API User and Secret
The following steps need to be performed by an Emarsys account owner.
1. Login to the Emarsys application
2. Go to **Admin > Security Settings**
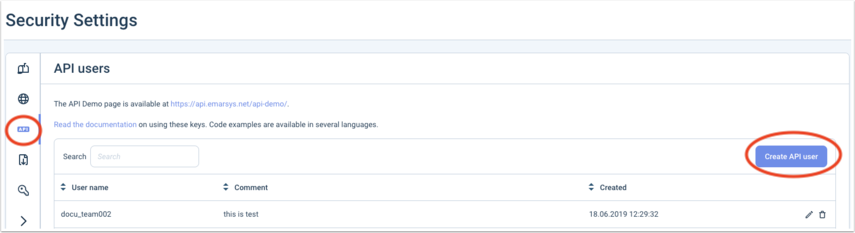
3. Press on **Create API user**
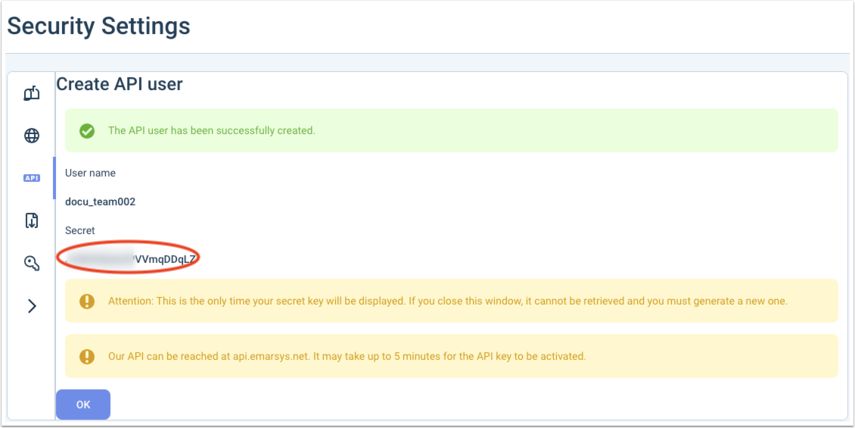
 4. Copy the resulting User name and Secret (note that the secret will no longer be available for copying once you leave this screen)
 ### Set Up API Permissions for the Newly Created User
1. Go to **Management > Security Settings > API Users**
2. Click on the edit button (in the form of a pencil)
3. You will reach a menu with toggles with all the possible Emarsys API permissions
### Set Up API Permissions for the Newly Created User
1. Go to **Management > Security Settings > API Users**
2. Click on the edit button (in the form of a pencil)
3. You will reach a menu with toggles with all the possible Emarsys API permissions
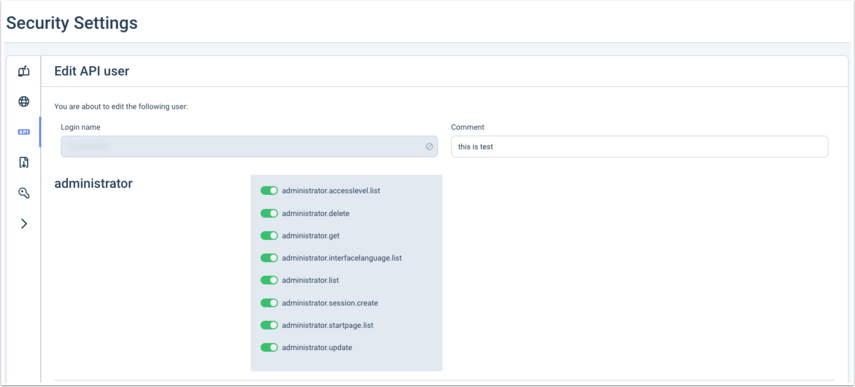 4. Find and toggle the `externalevent.trigger` permission
5. Click on **Edit** at the bottom of the page to apply the permission modifications
## Create a Dedicated Campaign for Aampe
A 4-step procedure to create a transaction push campaign that Aampe can use to personalize your notifications.
### Step 1: Create Personalization Tokens
1. Go to **Content > Personalization**
2. Click on **Create Token**
3. Select **External Data** in the Choose Personalization Capability window
4. Find and toggle the `externalevent.trigger` permission
5. Click on **Edit** at the bottom of the page to apply the permission modifications
## Create a Dedicated Campaign for Aampe
A 4-step procedure to create a transaction push campaign that Aampe can use to personalize your notifications.
### Step 1: Create Personalization Tokens
1. Go to **Content > Personalization**
2. Click on **Create Token**
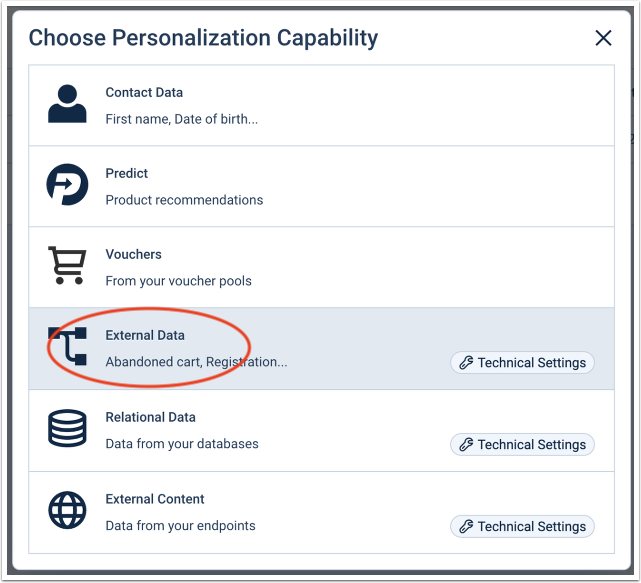
3. Select **External Data** in the Choose Personalization Capability window
 4. Enter "Aampe Title" under Name and "Aampe" under Category. Create "Aampe" category by clicking **Create Category**
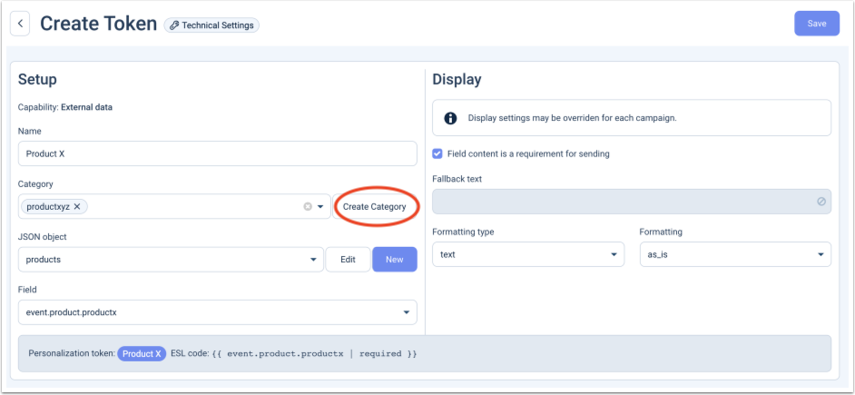 5. Click on **New** in the JSON object section
6. Enter "aampe" under Name
7. Copy/paste the following JSON snippet into the code editor:
```json theme={null}
{
"aampe": {
"title": "Push notification title",
"body": "Push notification body"
}
}
```
8. Press on **Modify**
9. Select `event.aampe.title` in the Field section
10. Click **Save**
11. Click on **Create Token** again selecting **External Data** in the Choose Personalization Capability window
12. This time, enter "Aampe Body" under Name and "Aampe" Category for this token.
13. Select the "aampe" JSON object that you just created
14. Select `event.aampe.body` in the Field section
15. Click **Save**
### Step 2: Create Push Campaign
1. Go to **Channels > Mobile Engage**
2. Select the **Push Messages** tab
3. Click **Create Push campaign**
4. In the campaign wizard, enter "Aampe" in Message name, select your mobile app and set Recipient Source to "Automation Center"
5. Click on **New** in the JSON object section
6. Enter "aampe" under Name
7. Copy/paste the following JSON snippet into the code editor:
```json theme={null}
{
"aampe": {
"title": "Push notification title",
"body": "Push notification body"
}
}
```
8. Press on **Modify**
9. Select `event.aampe.title` in the Field section
10. Click **Save**
11. Click on **Create Token** again selecting **External Data** in the Choose Personalization Capability window
12. This time, enter "Aampe Body" under Name and "Aampe" Category for this token.
13. Select the "aampe" JSON object that you just created
14. Select `event.aampe.body` in the Field section
15. Click **Save**
### Step 2: Create Push Campaign
1. Go to **Channels > Mobile Engage**
2. Select the **Push Messages** tab
3. Click **Create Push campaign**
4. In the campaign wizard, enter "Aampe" in Message name, select your mobile app and set Recipient Source to "Automation Center"
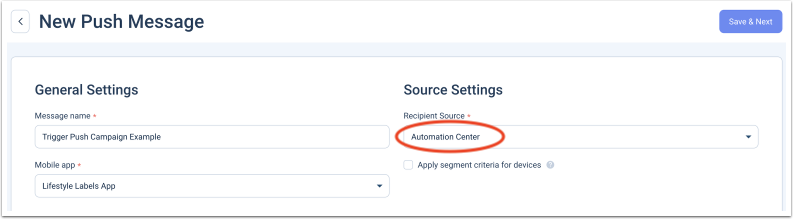 5. Drag the Aampe Title and Aampe Body personalization tokens respectively to the title and body sections of the notification in the preview pane.
6. Click **Ready to Launch**
### Step 3: Set Up an External Event
1. Go to **Management > External Events**
2. Click on **Create External Event**
3. Enter "Aampe push trigger" under External event name
4. Click on **Create**
5. Copy the external event ID number, it will be needed later when setting up the integration in the Aampe composer
### Step 4: Create an Interactions Program
1. Go to **Automation > Automation**
2. Click on **Create Program**
3. Select **Behavior-focused journeys (Interactions)**
4. Select **External event** as the trigger
5. Drag the Aampe Title and Aampe Body personalization tokens respectively to the title and body sections of the notification in the preview pane.
6. Click **Ready to Launch**
### Step 3: Set Up an External Event
1. Go to **Management > External Events**
2. Click on **Create External Event**
3. Enter "Aampe push trigger" under External event name
4. Click on **Create**
5. Copy the external event ID number, it will be needed later when setting up the integration in the Aampe composer
### Step 4: Create an Interactions Program
1. Go to **Automation > Automation**
2. Click on **Create Program**
3. Select **Behavior-focused journeys (Interactions)**
4. Select **External event** as the trigger
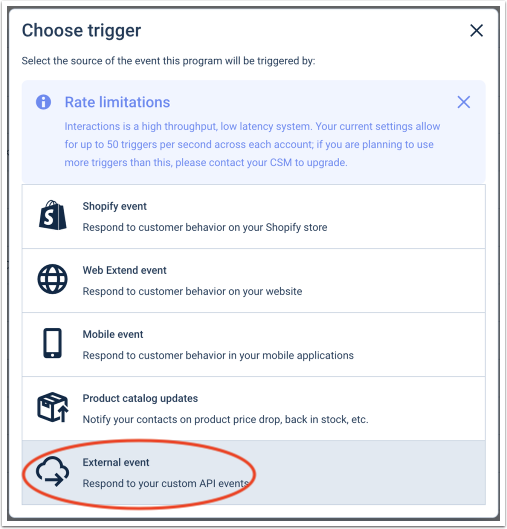 5. Double click on the External event node
6. Select the external event created in Step 3
7. Click **OK**
8. Click on the **Decision** node to add it to the program
9. Double click on the new Decision node that you just added
10. Add the segment with all of your users
11. Click **OK**
12. Click on the **Mobile Engagement push message** channel to add it to the program
13. Double click on the Mobile Engagement push message node
14. Select the "Aampe" push campaign that you created in Step 2 using the dropdown menu
15. Click **OK**
16. Click **Activate**
## Set Up the Integration in the Aampe Composer
1. Go to [https://compose.aampe.com](https://compose.aampe.com) and login using your Aampe credentials
2. Navigate to **Configure > Push Provider**
3. Open the Emarsys integration
4. Input your API User name, Secret, and External Event ID you generated during this setup tutorial
Congrats! You have successfully integrated Aampe and Emarsys.
5. Double click on the External event node
6. Select the external event created in Step 3
7. Click **OK**
8. Click on the **Decision** node to add it to the program
9. Double click on the new Decision node that you just added
10. Add the segment with all of your users
11. Click **OK**
12. Click on the **Mobile Engagement push message** channel to add it to the program
13. Double click on the Mobile Engagement push message node
14. Select the "Aampe" push campaign that you created in Step 2 using the dropdown menu
15. Click **OK**
16. Click **Activate**
## Set Up the Integration in the Aampe Composer
1. Go to [https://compose.aampe.com](https://compose.aampe.com) and login using your Aampe credentials
2. Navigate to **Configure > Push Provider**
3. Open the Emarsys integration
4. Input your API User name, Secret, and External Event ID you generated during this setup tutorial
Congrats! You have successfully integrated Aampe and Emarsys.